If you use Cloudflare to manage your domains, DNS, or any other services, you are probably familiar with the two-factor authentication (2FA) setup process. By default, most users reach for a TOTP authenticator app — you know the drill: scan a QR code, get a six-digit code every 30 seconds, type it in. It works, but it is not exactly frictionless. What many Cloudflare users do not realize is that there is a better option hiding in plain sight: you can use a Passkey instead of an authenticator app to secure your Cloudflare account.
This guide walks you through exactly how to set that up, why it is worth doing, and what the experience looks like once you have made the switch. Spoiler: it is genuinely great.
What Is a Passkey and Why Does It Matter?
A passkey is a modern, phishing-resistant credential based on the WebAuthn/FIDO2 standard. Instead of storing a shared secret (like a TOTP seed) on both your device and the server, passkeys use public-key cryptography. Your device holds the private key, and the server only ever sees the public key. Authentication happens locally — via Face ID, Touch ID, Windows Hello, or a PIN — and the cryptographic proof is sent to the server.
The practical benefits are significant:
- No codes to type. Authentication is a single biometric gesture or PIN tap.
- Phishing-resistant by design. A passkey only works on the exact domain it was registered for. A fake Cloudflare login page cannot steal it.
- Synced across your devices. On iOS and macOS, passkeys sync via iCloud Keychain. On Android, they sync via Google Password Manager.
- No app dependency. You do not need a separate authenticator app installed and configured.
Passkeys are increasingly supported across the web, and more password managers are adding support for them too. If you are already using a tool like the one covered in our NordPass Review 2026, you may already have passkey support available to you.
Cloudflare’s Two-Factor Authentication Options
Cloudflare supports two distinct 2FA methods, both of which can be active simultaneously:
- Mobile App Authentication — The classic TOTP method. You configure it with an authenticator app like Google Authenticator, Authy, or a privacy-focused option like the one reviewed in our Proton Authenticator Review 2026. It generates a time-based six-digit code you enter at login.
- Security Key Authentication — This is the section that supports hardware security keys like YubiKey — but also, and this is the part that surprises most people, wachtwoorden.
The Security Key Authentication section is found at the Cloudflare dashboard under My Profile → Access Management → Authentication → Two-Factor Authentication. The wording on the page leans toward hardware tokens and YubiKeys, but the underlying implementation uses the WebAuthn standard — which is exactly the same standard passkeys are built on. That means any platform authenticator that supports passkeys (Apple, Google, Microsoft) will work here.
How to Add a Passkey to Your Cloudflare Account
The process is straightforward once you know where to look. Here is a step-by-step breakdown.
Log in to the Cloudflare dashboard and click on your profile icon in the top-right corner. Select My Profile, then navigate to Access Management in the left-hand sidebar. Click on Authenticatie. You will land on the Two-Factor Authentication page.
Step 2: Find the Security Key Authentication Section
Scroll down past the overview section. You will see two distinct cards: one for Security Key Authentication and one for Mobile App Authentication. The Security Key section is where you need to be.
Step 3: Click “Add”
In the top-right corner of the Security Key Authentication card, there is an Add button. Click it. Cloudflare will prompt you to verify your current password before proceeding — a standard security gate to prevent unauthorized additions.
Step 4: Follow the Browser Prompt
Once you have verified your password, your browser will trigger a WebAuthn prompt. On a Mac or iPhone, this will typically ask if you want to save a passkey to iCloud Keychain or use a device with a security key. Choose your passkey option. On iOS or macOS, authenticate with Face ID or Touch ID. Your passkey is registered.
Step 5: Name Your Passkey
Cloudflare will ask you to give the new credential a name. Something descriptive like “iPhone Passkey” or “MacBook Passkey” is helpful, especially if you plan to register multiple devices. Once saved, the passkey appears in your security key list with an added date and last-used timestamp.
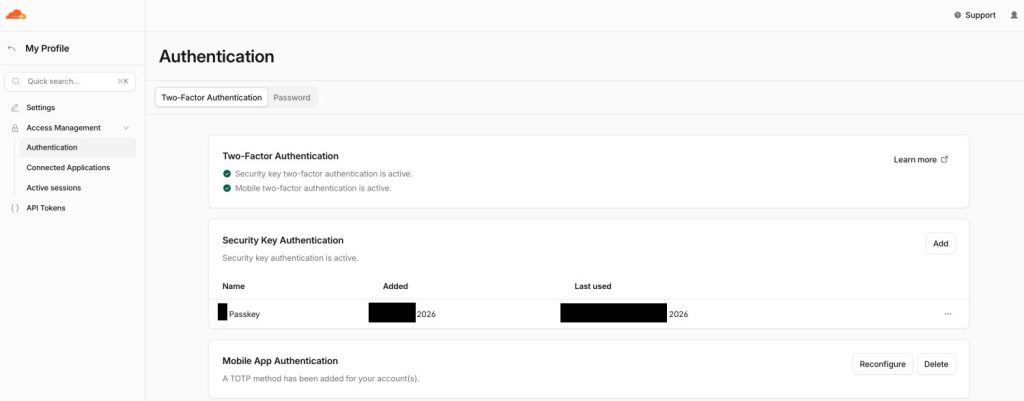
As you can see in the screenshot above, once the passkey is set up, the dashboard confirms that Security key two-factor authentication is active alongside the optional TOTP method. The registered passkey appears in the table with its name, the year it was added, and the last time it was used. Clean and simple.
The Login Experience After Switching to a Passkey
This is where things genuinely get better. Once your passkey is registered, the Cloudflare login flow changes noticeably. After entering your email and password, instead of being asked to open an authenticator app and type a six-digit code, you are prompted to authenticate with your security key. On a Mac, a Touch ID prompt appears. On an iPhone, Face ID handles it. The whole process takes under two seconds.
There is no code to remember, no app to open, and no risk of a code expiring mid-entry. For anyone who has ever fumbled with an authenticator app while their 30-second window ticked down, this feels like a meaningful upgrade.
Can You Keep Both Methods Active?
Yes — and in fact, that is exactly what the screenshot above shows. Both Security key two-factor authentication is active en Mobile two-factor authentication is active are confirmed simultaneously. This is a sensible setup for redundancy. If your primary device is unavailable, you still have TOTP as a fallback.
However, if you are confident in your passkey setup and have the credential synced across multiple devices (for example, via iCloud Keychain on both your iPhone and MacBook), you may decide to delete the TOTP method to simplify things. The Delete button next to Mobile App Authentication makes this easy to do whenever you are ready.
Passkey Sync: What Platforms Are Supported?
This is an important practical consideration. Passkeys stored by a platform authenticator are synced within that platform’s ecosystem:
- Apple (iOS/macOS): Passkeys sync via iCloud Keychain across all your Apple devices signed into the same Apple ID. This is probably the most seamless experience currently available.
- Google (Android/Chrome): Passkeys sync via Google Password Manager across Android devices and Chrome on desktop.
- Windows: Windows Hello supports passkeys stored locally, with sync capabilities being expanded over time.
- Third-party password managers: Increasingly, password managers are adding passkey support, which can make them available cross-platform.
If you regularly switch between Apple and non-Apple devices, it is worth double-checking that your passkey solution of choice syncs across all of them before removing your TOTP fallback entirely.
A Note on Hardware Security Keys
While this article focuses on passkeys (software/platform-based credentials), it is worth mentioning that the same Security Key Authentication section also supports hardware tokens like YubiKey. These physical devices plug into a USB port or tap via NFC and are arguably even more secure than synced passkeys because they cannot be phished remotely and the private key never leaves the physical hardware.
If you manage a Cloudflare account for a business or handle sensitive infrastructure — perhaps you are running something more complex and have been looking at Europese alternatieven voor Cloudflare for comparison — a hardware security key may be the right choice. For personal accounts or solo developers, a synced passkey offers a very compelling balance of security and convenience.
Why This Matters for Account Security
Cloudflare is not a casual account. If someone gains access to your Cloudflare dashboard, they potentially control your DNS records, your SSL certificates, your firewall rules, and depending on your setup, your entire web presence. The stakes for a compromised Cloudflare account are unusually high compared to, say, a social media profile.
TOTP authentication is solid, but it has known weaknesses. A well-crafted phishing site can sit as a real-time proxy between you and Cloudflare, capturing both your password and the TOTP code within the 30-second validity window and replaying it immediately. Passkeys eliminate this attack vector entirely — the browser binds the credential to the exact origin, so a phishing domain simply gets nothing useful.
Switching to a passkey is one of the highest-value security improvements you can make to your Cloudflare account with minimal effort. It takes about two minutes to set up and makes your login significantly more resistant to the most common attack patterns used against web professionals today.
Conclusie
Cloudflare’s wording around “Security Key Authentication” might make you think of expensive hardware tokens, but the reality is more accessible than that. Thanks to the WebAuthn foundation underneath, passkeys — including the ones already stored in your iPhone, Mac, or Android device — work perfectly. The setup takes a couple of minutes, the day-to-day experience is genuinely smoother than TOTP, and the security properties are strictly better.
If you have been managing your Cloudflare account with an authenticator app until now, this is a worthwhile upgrade. Navigate to My Profile → Access Management → Authentication, hit Add in the Security Key section, and let your device handle the rest. You might be pleasantly surprised — just as many users are when they discover the feature for the first time.
Last Updated on 28 september 2026
 Nederlands
  English
  Deutsch
  Français
  Español
  Italiano
  Svenska